Our Family Command Center
I am so, so, so excited for this post today! This “project reveal” has been a long time in the making…in fact, I just finished the last little craft for this space this week so that I could (finally) snap some photos and get it up for you all to see!

On a few occasions, I’ve mentioned that one of our biggest organizational challenges as a family is mail, paperwork, keys, wallets, water bottles, and other day-to-day things that tend to lay around, pile up, and ultimately, get lost. Clutter all over the kitchen table drives me batty, and a mail basket in our family always turn into a catch all (also known as a black hole).
As we were moving into our new home, I was DETERMINED to find a space to serve as mission control for our family. A drop zone for bags and keys and mail, but also a place to organize all the necessary resources for day-to-day life. Since we enter and exit our house through a side door, and this little nook (right inside the door) would have otherwise gone un-used, it seemed like the perfect space for our new family command center.

There are so many fun goodies here to show you…
When figuring out what all was going to be in this space, the first priority was mail. We had to find a way to organize mail as it came in the house. If we don’t sort (and throw away) mail as it comes in, we get totally backed up. This 5-pocket metal wall-mounted file was the perfect solution!

Each “bin” was given a specific label: one for myself and one for my husband (so when we find papers laying around the house that belong to the other, we have a place to put them!). We then made three other categories: one for “action” items (those that need to be dealt with in the near future); “file” items (things things that need to make their way into our filing cabinets); and “shred” items (those with personal information that are better shredded than just thrown away). This filing system has worked wonders for keeping track of important papers and keeping mail from piling up on counters!

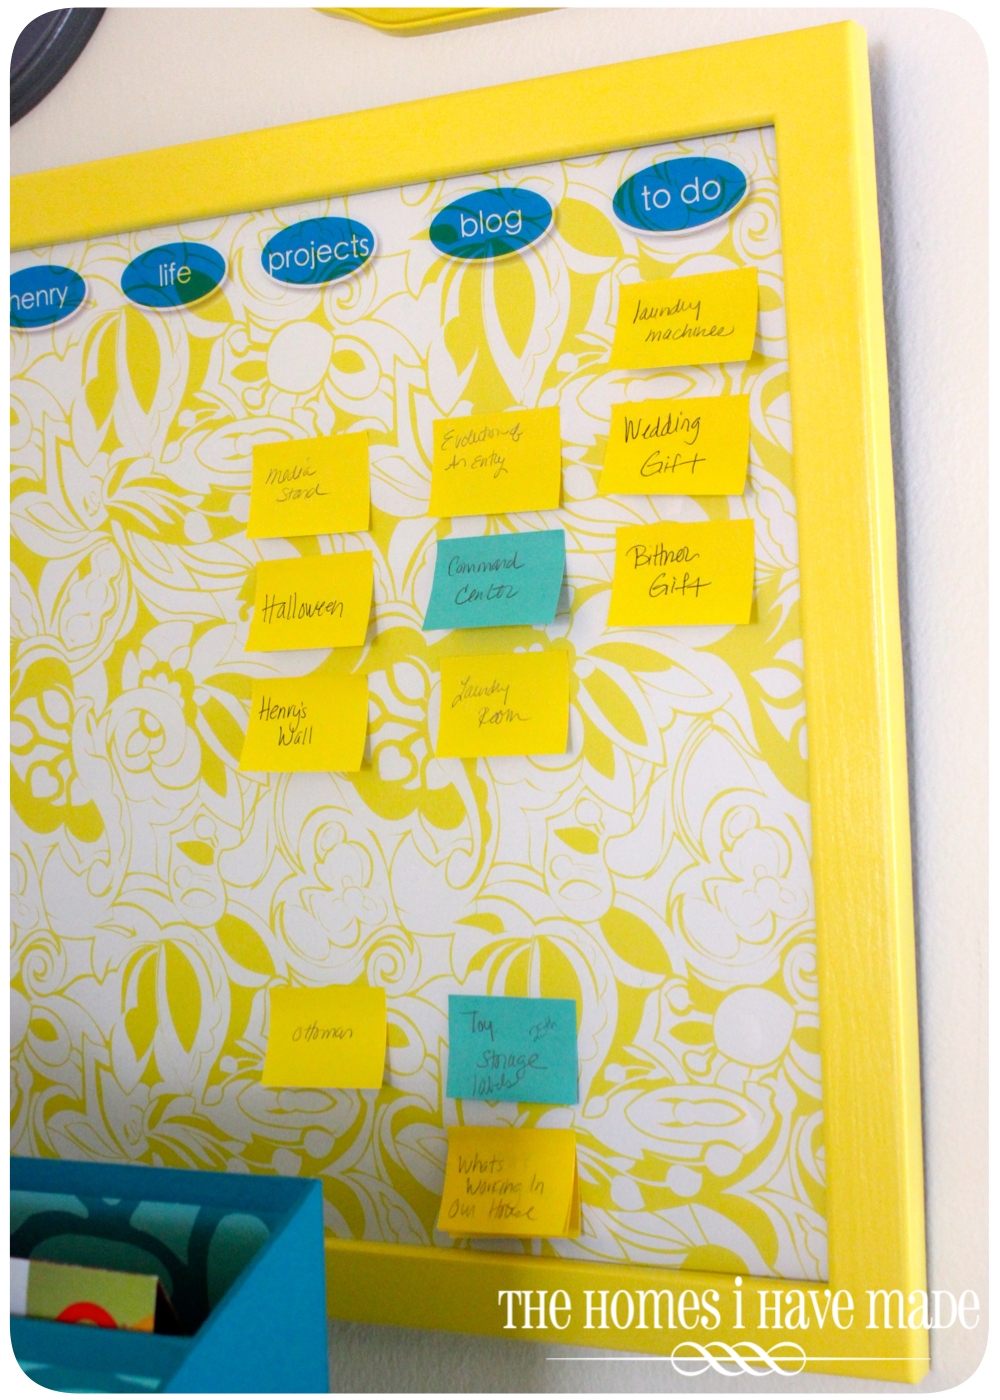
Another goal for this space was to somehow organize all the various To-Dos for each family member and for around the house (including both chores and projects). I found this sticky note concept on Pinterest and knew it would be the perfect solution for us! I need to write things down, but I also need them constantly visible (so I don’t forget) and accessible (so it’s easy to add things as necessary).

I particularly love the “project’ and “blog” columns for several reasons. One, the sticky notes help me stay focused on the “current” projects, as well as prioritize and organize what’s coming next. Then, once a project is done, I just move the sticky note over to the “blog” column. Once the post goes up on the blog, I just throw the sticky away. It really helps me keep track of what projects are next, and what is still yet to be posted on the blog!
Another big clutter/paper culprit in our house: receipts and coupons. I couldn’t take them stuck to the refrigerator any longer, so this little desk organizer gives me a place to put both as soon as they come in the house. Now, when we need a receipt or are heading out shopping, we know exactly where everything is!

This left side of the command center works really hard for us…

But so does the right side!

The other big feature of this command center is a magnetized board (this is the same size and shape as the magnet board I used for Henry’s play station!). Not everything can/should be filed away, and we needed a way to keep some papers and schedules easily accessible. A 20″ square piece of sheet metal solved our dilemma…I love the industrial look of the sheet metal and enjoy the change from a plain ol’ cork board.

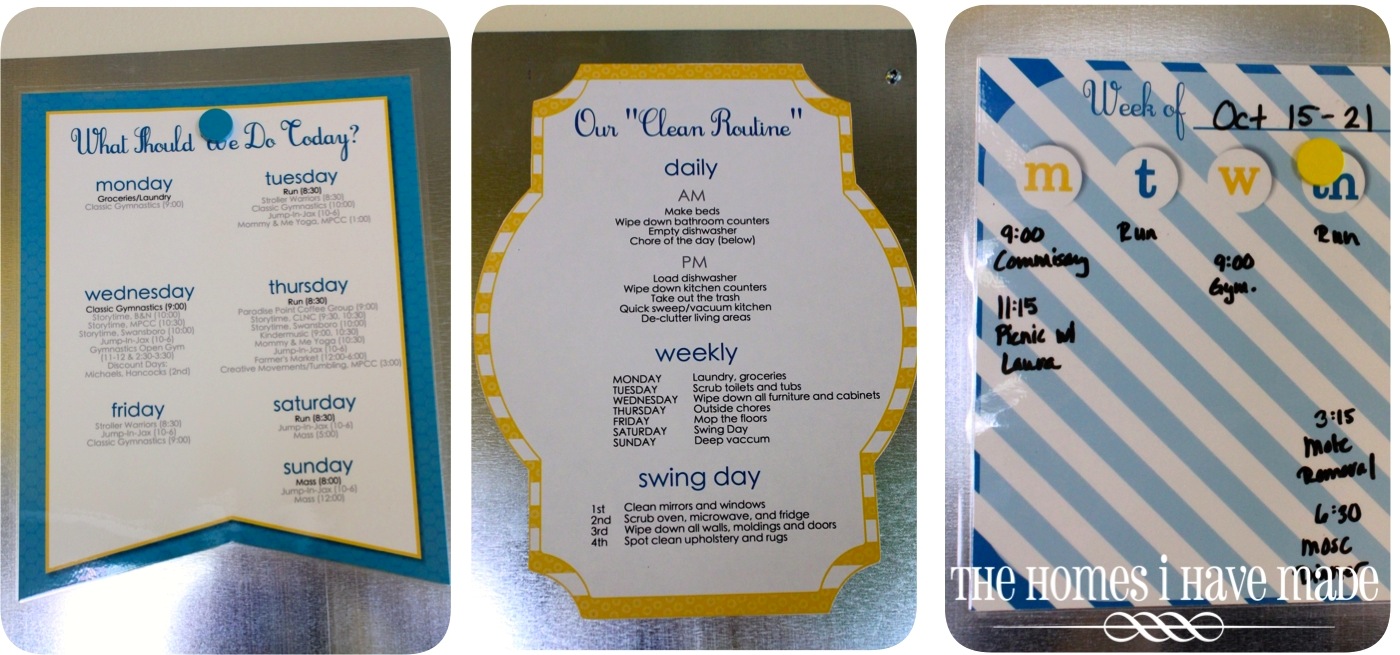
The magnetized board has some cute printable that I customized for our family:
- What Should We Do Today? – A list of local activities for days when Henry and I just can’t find anything to do!
- Our Clean Routine – Our daily, weekly, and monthly cleaning schedule
- One-week calendar – a laminated 7-day calendar that we fill in each week with appointments and outings.
There’s a few other little elements of this command center that really make it fun and functional for us!
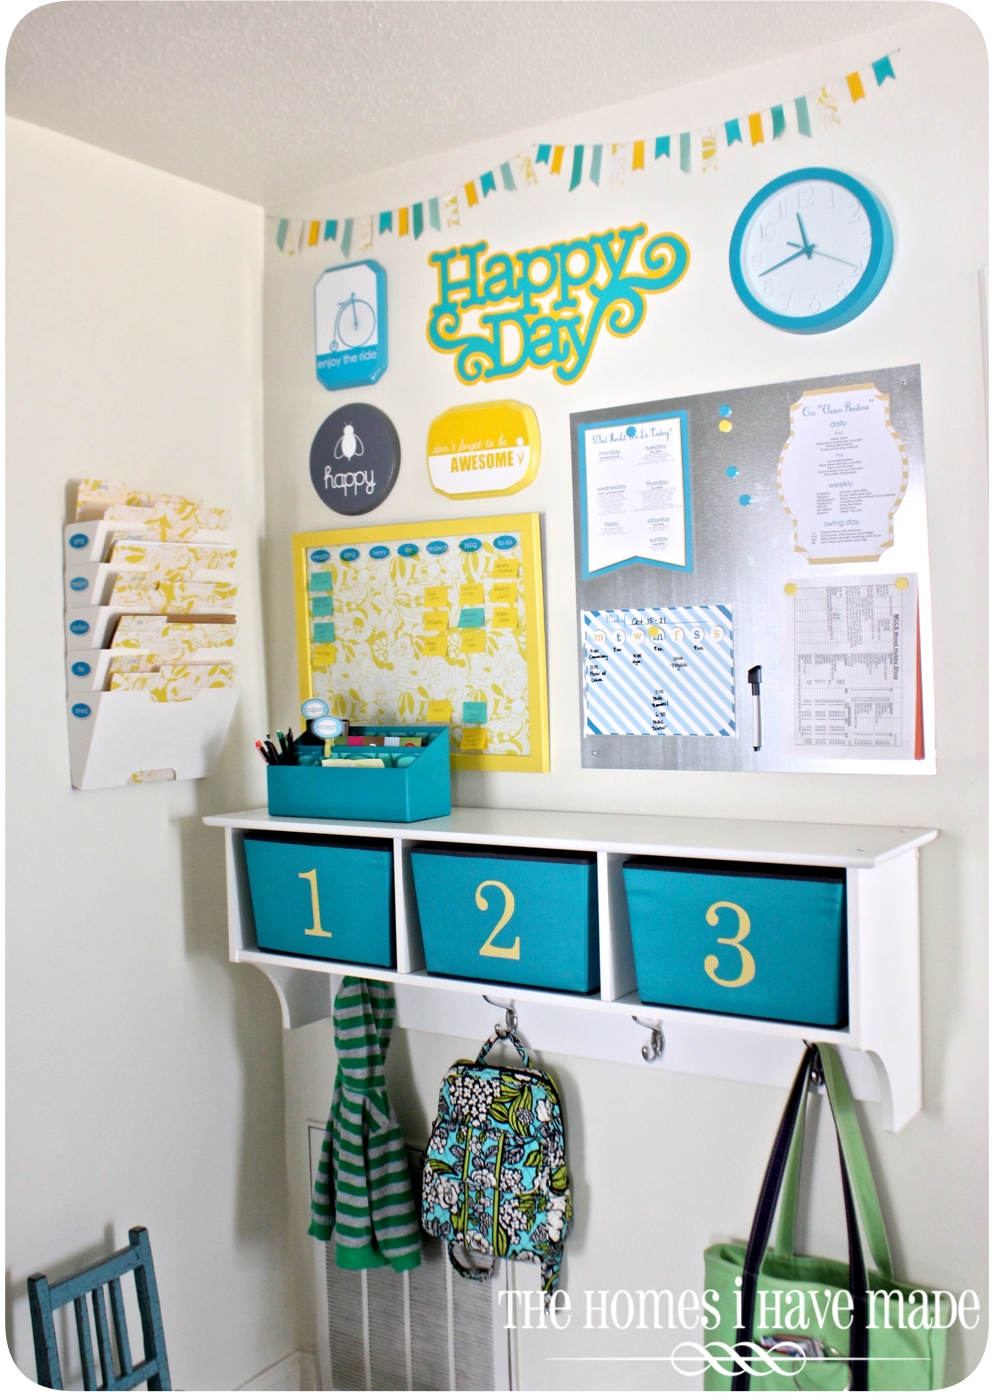
First up, this awesome cubby shelf. We bought this mudroom shelf from Amazon. Instead of hanging it high on the wall, we mounted it slightly above counter height so that we could use the top surface. I then hunted around for the perfect baskets to fit in the cubbies. It turned out that these baskets (from Target) were a perfect fit. I embellished each one with a fabric number to keep them straight. Originally, we thought each family member would get a cubby…but they have evolved differently. Cubby 1 is currently empty; cubby 2 holds sunscreen bug spray, etc; and cubby 3 holds Greg’s school books and papers. Labeling with numbers instead of letters means that we can easily change up what goes inside!

I also made some super cute, super simple, and super cheep artwork for the space. A vinyl decal, mini bunting, and these cute typography plaques help make the space cheerful and fun! (A full tutorial is coming soon!)

This little nook was so much fun to work on, and I am super excited to report that it’s been incredibly functional for us. We were in desperate need of a drop zone, as well as some resources for organizing our household paperwork…and this nook fits the bill just right!

And because it’s fun to see how a blank wall can be transformed…here’s a few quick before and after shots!

The view coming in the door!

Pheeeeeew! That was a doosy of a post. There’s so much here, so you better believe I have some follow-up posts and tutorials to show you how I pulled this all together. Keep your eyes out next week for a few tutorials as well as a full resource list!
Have a great weekend!!!!

P.S. You can now read all the follow-on detailed posts to this project HERE!!!
 |
Megan

52 Comments on “Our Family Command Center”
You did an incredible job!! It looks bright, fun, and organized!! I absolutely love it!!
I have been peaking in on your blog for a while now. You absolutely amaze me with the amount of creativity the pours from you and your wonderful decorating style. How do you get stuff / projects done so fast? Do you sleep? lol 😉 Love your family command center. It is so Happy! Your post is the nudge I need to finish up our family command center. 🙂
Oh I love that! Especially the "what should we do today" page. What brilliant ideas!
Adorable!! I've been considering the sheet metal concept for awhile now…must go do it!
Absolutely amazing! I love the colors and all the tips you've provided. We have one of those black hole bins too. Thanks for the inspiration. Megan
Great job! Thank you for the inspiration. We have a basket, er, "black hole" in our kitchen too, and it drives me nutty. I love the sheet metal magnetized board and the 5-bin wall organizer.
what a lovely bright happy spot!!
Love your command center!! I need to do this with four kids. I have the wall space, I'm just trying to pin down the materials. Where did you get the file hanging folders? Are they spray painted white? I've been looking for white, but can't seem to find any.
This drop spot is FANTASTIC! My mind is whirling with where I could work some of these ideas into my home!
I absolutely love this!!! I have a wall in my kitchen coming from the garage that would make an excellent place to have one of these stations. It seems like I have purses, keys, bags, etc. all over the place. Thank you for the awesome idea.
I left a comment at Jen's but I love that this small space turned into something great! We don't have a drop zone for mail, shoes, coats, etc. it gets spilt between sittingin the front hall – shoes in a storage cube thing, and mail, keys, etc, in the corner of the kitchen. You've got me looking around my house to find a space to create something like this. I love the bright colors, and the mail bins are great. Where did you find those?
Hi Andrea! The mail file is from IKEA, but I ordered it from Amazon because we don't have one near us. I think it's cheaper in the store, but here's the link: http://www.amazon.com/Ikea-Kvissle-Magazine-White-Metal/dp/B008NWJZLC/ref=sr_1_4?ie=UTF8&qid=1357778821&sr=8-4&keywords=IKEA+file
Hope that helps! Good luck 🙂
Megan
I think you have helped me decide how better to use the wall leading to the garage, which is the way we leave the house. I LOVE the mudroom shelf, but I need those baskets as well. As fast as Target can go through some inventory, how long ago did you find the baskets?? I'm worried I'll get the shelf and then go forever without the much needed baskets. Thanks for the ideas!
Hi Stephanie! I'm so glad my post gave you some ideas!! I, too, was worried I'd never find baskets to fit just right. I did buy those baskets from Target in the Fall, but I'm pretty sure they still cary them, at least online! Here's the link:
http://www.target.com/p/room-essentials-med-tapered-bin-blue-set-of-3/-/A-14036272#prodSlot=medium_1_5&term=room%20essentials%20bin
Good luck!
Wow, I love so much about this!! Thanks for all the wonderful ideas. In the process of planning something for my home now!!
This is AMAZING! I found your cute blog through iheartorganizing. I adore the font you used with your vinyl. Is it a cricut cartridge or a Silhouette font? Great job! 🙂
The "Happy Day" decal is from the Cricut Alphabet cartridge that comes with the new Expressions 2 Machine – it's not a font but an actual graphic from that cartridge!
looks absolutely amazing!! (And are you a nerd fighter by any chance?!)
Oh sorry! Don't Forget to be Awesome or DFTBA is just a saying for the group, that is why I asked. (and don't worry, we are a just a group of people who try to make the world a better place!)
Thanks for all the inspiration! I also want to know where you got the hanging folders.
Found your blog via iheartorganizing & have been in love with your Command Center ever since. I've bookmarked each post so I can implement the ideas in my office nook. My first step, however, is to make the wall on which I plan to work a different color, as it is currently a "blah" shade of tan. I really like the pink printables you offer, so I'll probably do something bright & fun with that shade in mind. And ideas as to whether I should go with a solid background versus stripes or flowers or something?
Saw your post on Jen's site. How did you make the labels on the side of the mail sorter. I love how they came out!
Wonderful command center! I love the plagues you made with the fun sayings! Gonna have to use that for inspiration for my little boy's room and daughter's room that I'm working on. Thanks for sharing!
I love the magnetic board – and I just finished making a command center for our family. Might have to make a couple of changes now that I've seen yours! Nice job
I have been looking and looking and looking for "the perfect" wall mounted file. The one you have would be perfect for us, can you tell me where you found it? Thanks!
It's from IKEA!
I love this space! How did you mount the sheet metal?
Please e-mail me I have several questions about combining several combo rooms in my house. My e-mail is [email protected]. You have inspired me and shown me some light at the end of our dark cluttered tunnel. Thank you, Charlotte
Pingback: Come organizzare un family command center
Pingback: back to school tips tricks
Pingback: | BHG Style Spotters
Pingback: 20 Cute & Functional Command Center Ideas
I love it, where did you get the sheet metal from?
Pingback: Taking Charge of the Chaos: Creating a Family Command Center
Pingback: 5 Command Centers that Will Inspire You - Simplicity Reclaimed