DIY Canvas Frame | A Tutorial for Beginners
I always envied bloggers who could construct amazing home decor from wood…that was just never my particular talent. However, I’ve learned over the years that you don’t need to be an amazing woodworker (or have a fully stocked workshop) to make some simple wood projects for your home. Today, I want to show you how to make a DIY Canvas Frame…from scratch…without any fancy tools or woodworking skills. This is a DIY project you (yes, you!) can do, and I promise the reward will be more than just a pretty piece of art!
Why Frame a Canvas?
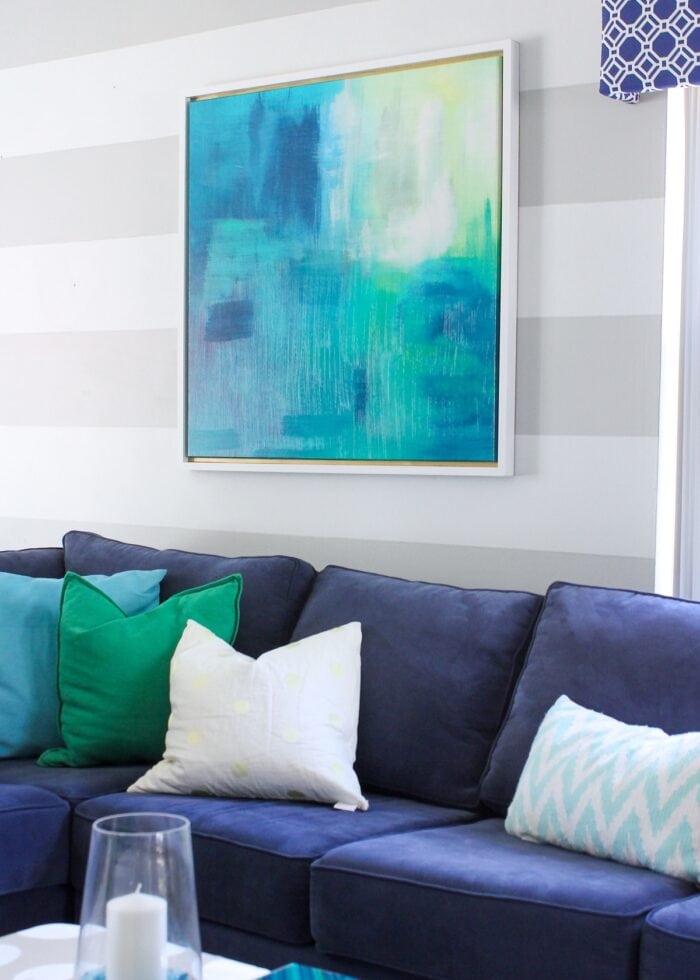
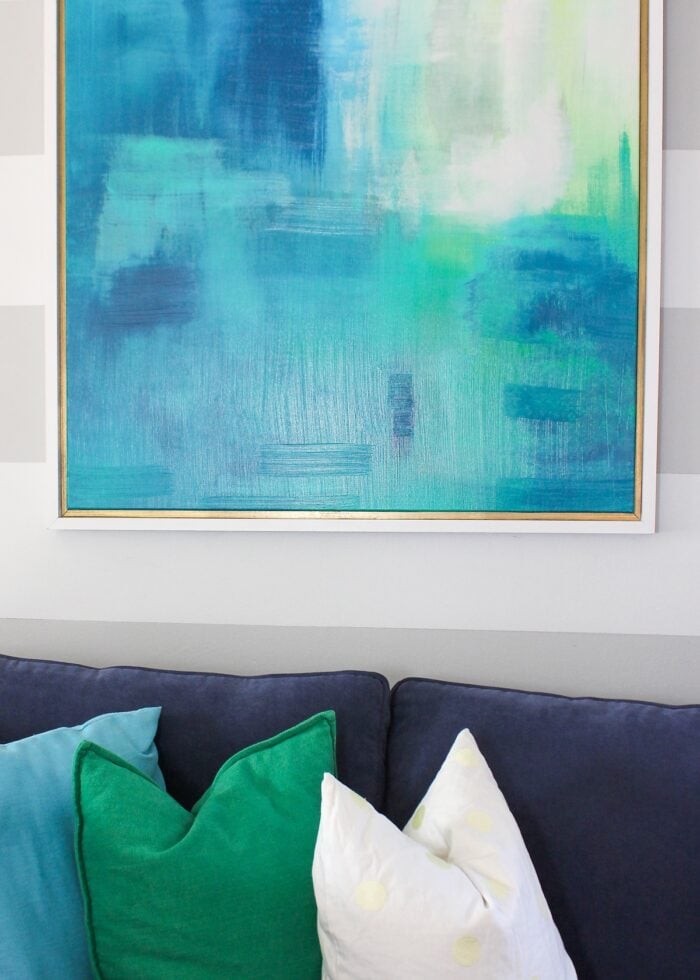
Years ago, we had a very big blank wall above our couch. I tried so many different frame arrangements and could never settle on anything that looked quite right. Imagine my excitement when I found a huge canvas (36″ square!), in our exact room colors, for just $70 at Marshalls. I loved the painting itself; the size, scale, and colors were so perfect. But it always felt…well…a bit unfinished.

One of my favorite ways to create consistency throughout a room is with similar framing. I had a hunch that adding a frame to this huge canvas would not only give it the “ooomph” it was lacking, but it would also help it coordinate better with everything else in the space.
But a custom frame for this (fairly inexpensive) canvas would have cost a fortune, so I decided to roll up my sleeves and try to make one myself…even though I had never used a miter saw or made a custom frame.
Thankfully, making a DIY Canvas Frame is pretty straight forward and the results are oh-so-worth it! Take a look!

This gorgeous DIY Canvas Frame cost me $20 total and took about an afternoon from start-to-finish. And I gained a TON of DIY confidence along the way! Let me walk you through this beginner project!
Flush Mount versus Float Mount
There are lots of ways to make a DIY Canvas Frame; and how you go about it will depend on the size and depth of your canvas, as well as how you want the frame to look. Specifically, if you want the frame flush against the canvas or to float away from it.
Flush Frame
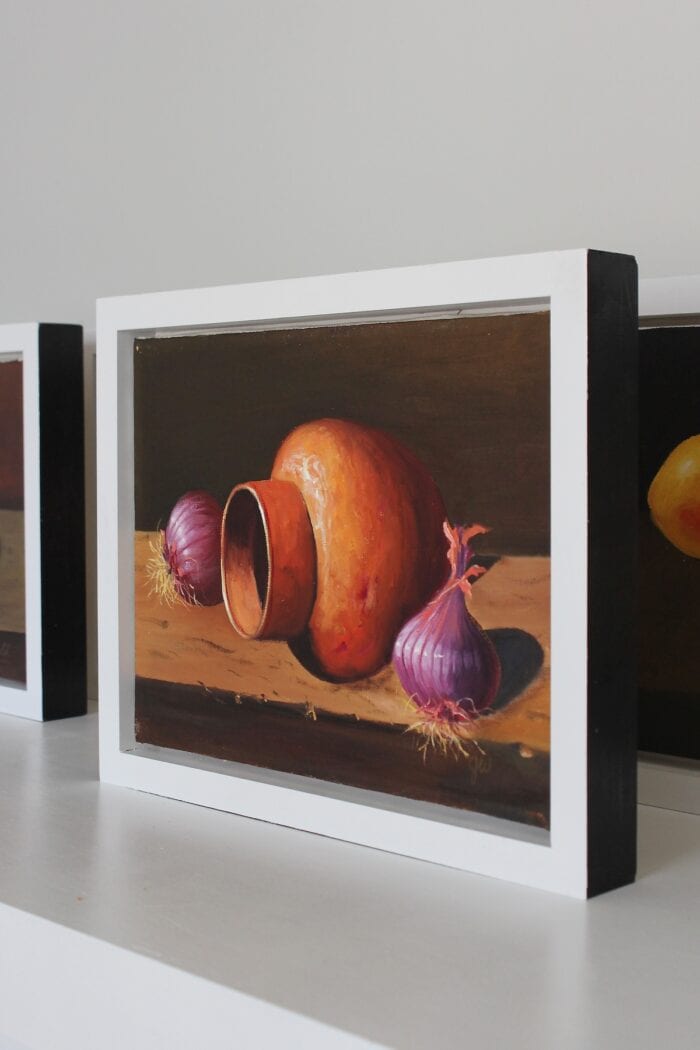
A “flush mount” frame is when a single frame perfectly hugs the canvas. There is no intentional gap and no “layers” of framing.
If you prefer this look, you can still use this tutorial (just skip any references to the gold inlay) or reference my Standing DIY Canvas Frame tutorial HERE.
Float Frame
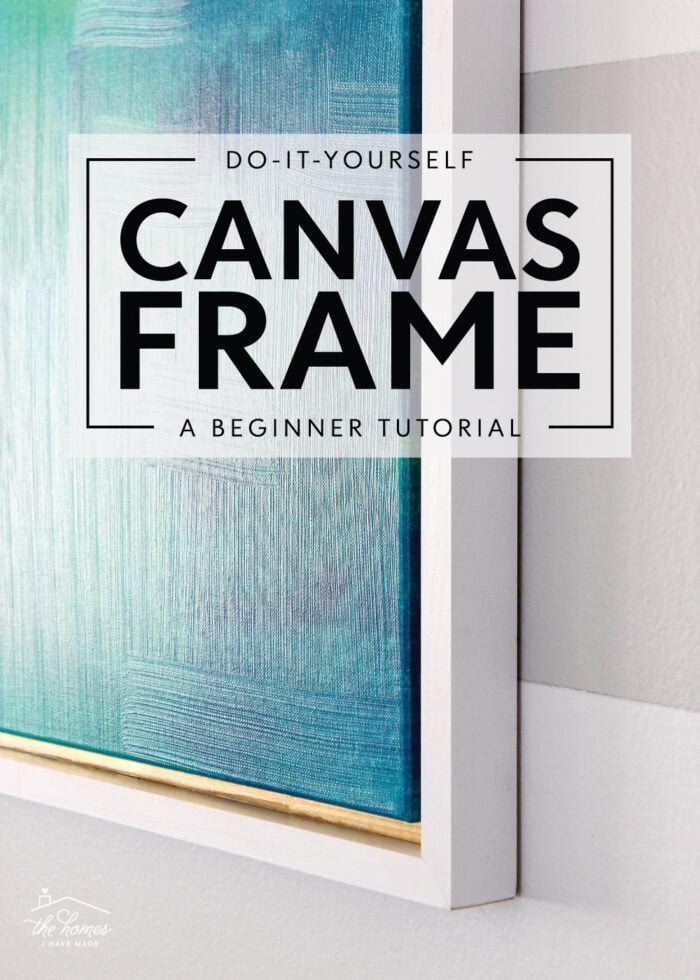
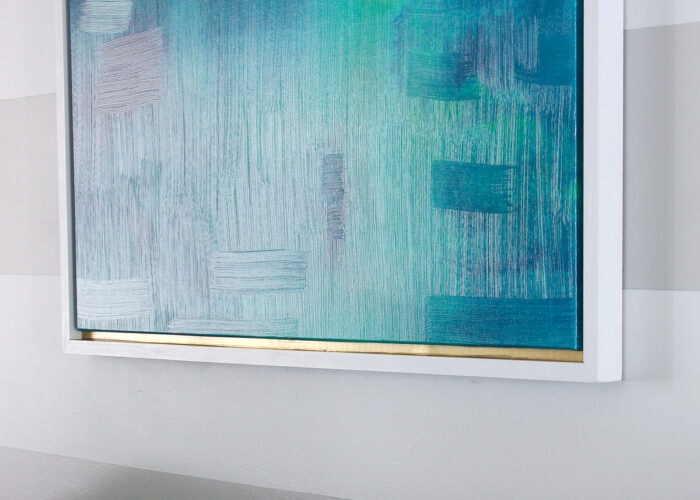
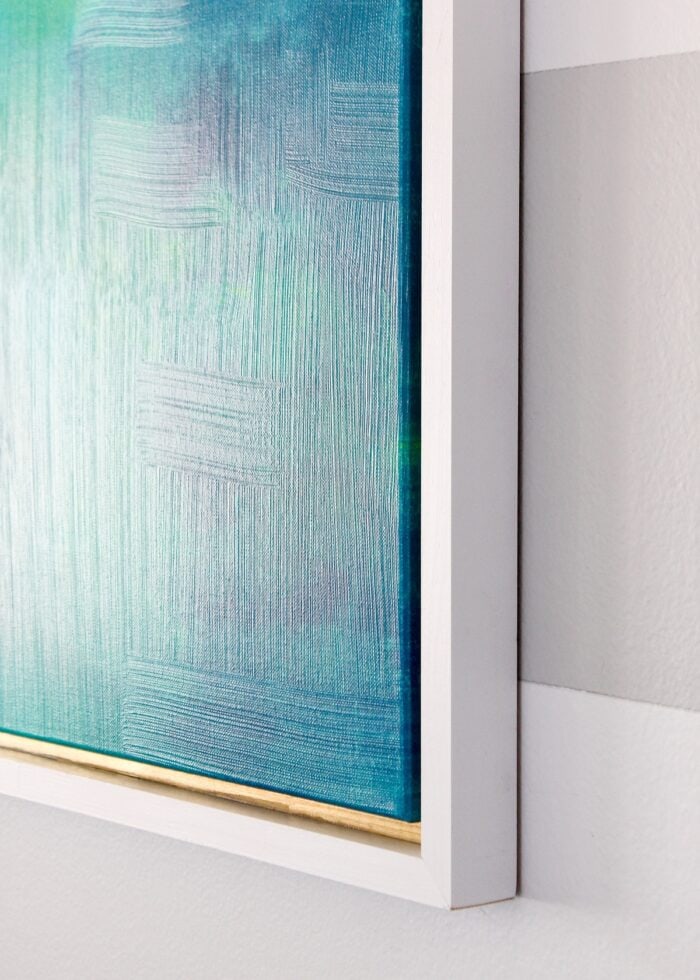
The other option is a “float mount” frame, where there is an intentional gap between the canvas and the outside frame. This gap is usually created by a wooden “inlay” or “spacer,” and it provides a really pretty visual dimension to the artwork. On my canvas, the “float” is created by that golden trim peeking out between the bright canvas and white frame.
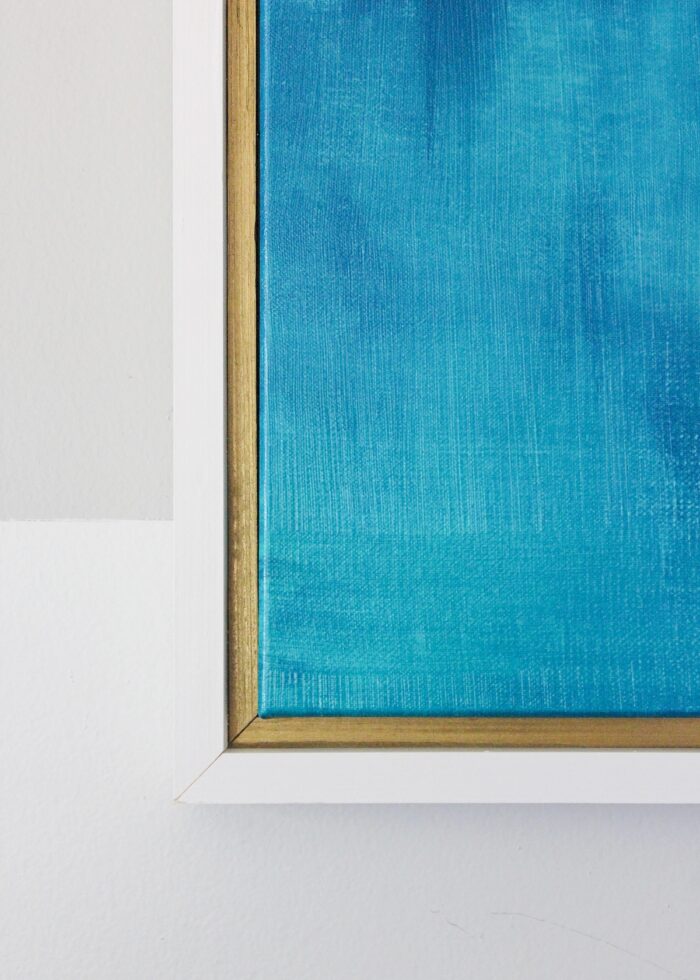
The float-mount frame provides some extra “heft” to the canvas itself, so it’s a great way to bulk up smaller pieces (or in my case, a big piece on an even bigger wall). The float canvas frame design isn’t necessarily any more difficult (it requires one extra step), so it really comes down to aesthetic preference.
Supplies Needed
Here is what you need to make a DIY Canvas Frame:
- Wood – What lengths you need will depend entirely on the size of your frame. Refer to Step 1 below to figure out how much wood you need.
- 1x2s of Quality Pine– for the outer frame – I chose the 2″ width for my wood because it matched the depth of my canvas; you can choose a different dimension that better suits your particular art.
- 1/2″ x 3/4″ Rectangular Trim – for the inlay (1/2″ square dowels can work here if you can find them in the lengths you need)
- Hardware
- Wood Finishing Nails
- Hanging Hardware (optional)
- Gorilla Wood Glue
- Paint or Wood Stain – in the colors of your choice
- Wood Filler (optional)
- Tools
- Tape Measure
- Miter Box & Saw – A powered version sure is nice, but I made my frame with a good ol’ fashioned manual version.
- Clamps
- Sanding Block, Sandpaper, or Sander
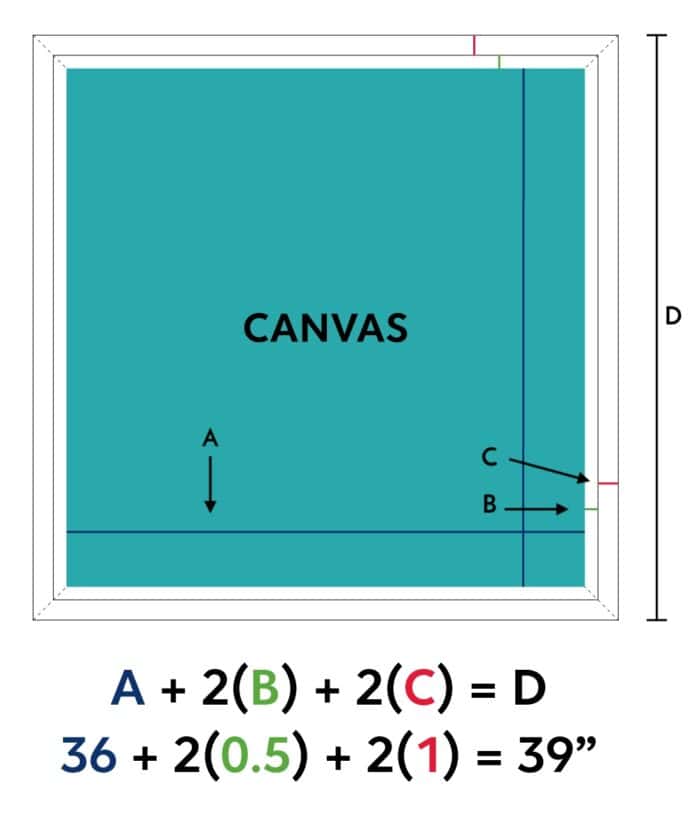
Step 1 – Determine Frame Measurements
The first and hardest step of this entire project is figuring out your frame measurements (at least it was for me!). That’s because you need to account for not just the mitered joints (diagonal junctions) but also the depth of the frame itself. Use the diagram below as a reference for figuring out the correct width and height measurements for your particular canvas size AND framing choices.
TIP! Once you know how much length you need for each side of your frame, use those measurements to determine what wood sizes you purchase.
For Example
For my 36″ square canvas, I needed ~39″ of wood frame on each side. So I purchased four 48″ 1x2s and 13′ of 1/2″ x 3/4″ rectangular trim. I originally was going to use 1/2″ square dowels, but they only come in 36″ lengths, which wouldn’t have been long enough for each side.
Step 2 – Paint or Stain the Wood
Whether you paint first and construct second or vice versa is somewhat of a personal choice:
- When you paint first, you will likely have to do touch-ups as the finish can get scratched during assembly.
- Painting/staining after assembly will give you a more perfect finish but can require a lot of taping/masking and waiting for coats to dry (especially for a two-toned look).
I personally recommend painting/staining the wood first (and doing touch-ups as needed after assembly). As such, start by painting and/or staining all your wood pieces in your preferred colors, before (yes, before) you cut them apart.
For my frame, I coated the 1x2s with my favorite white paint using a paint brush and the smaller trim with gold spray paint.

Want to save this post?
Step 3 – Glue Frame & Inlay Pieces Together
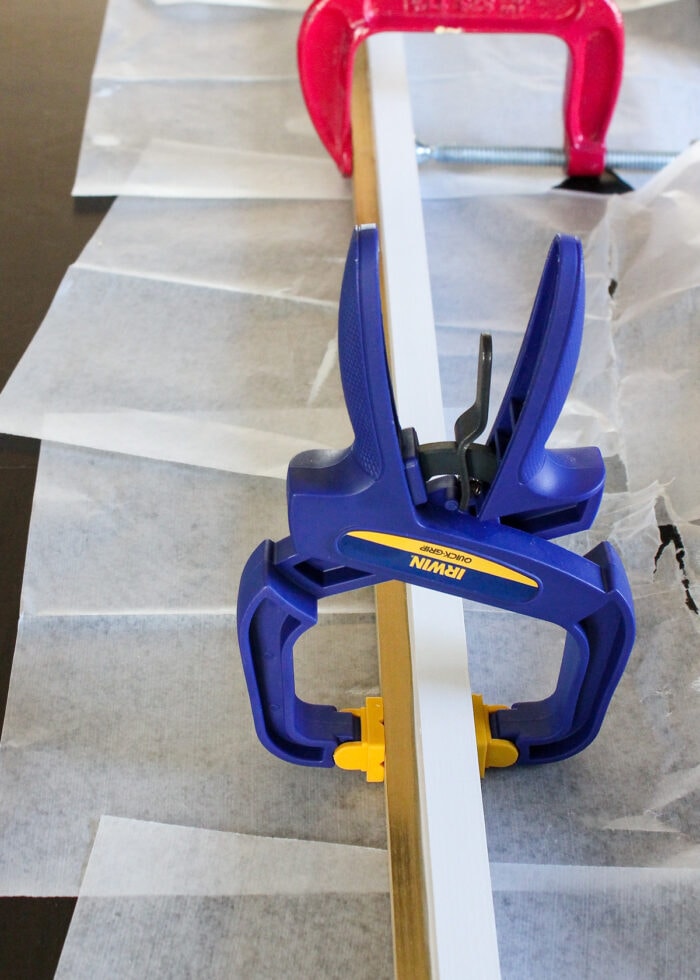
If you are new to DIY and/or don’t have really precise power tools, it can be incredibly difficult to cut several pieces of wood down to the exact same lengths. As such, I recommend first gluing the inlay pieces to the outer frame pieces (before you trim them down to the right size). This way, you ensure the two layers are tight together all the way around the frame.
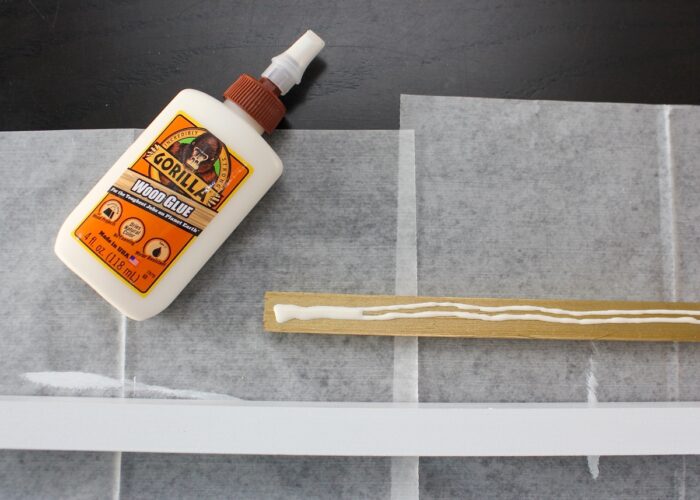
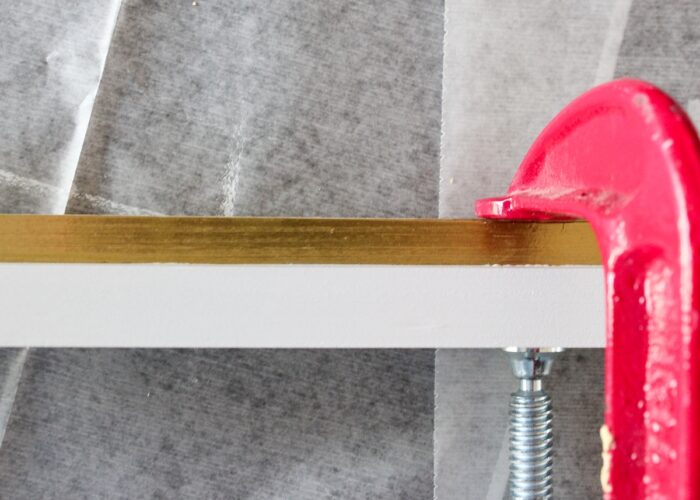
Using Gorilla Wood Glue (I LOVE this stuff!), secure the gold trim to the inside bottom edge of the white 1x2s. Once glued and positioned, use clamps to hold everything tightly together while the glue dries.
TIP! If any glue seeps out once you clamp the wood pieces together, be sure to wipe off any excess before it dries, as it’s VERY difficult to sand off!
Step 4 – Cut Frame Pieces
Next, use a miter box and saw to cut down each length of frame (the white and gold pieces together) to the correct measurements identified in Step 1. Be sure you cut the 45-degree angle ends positioned so that the white frame piece measures longer than the gold. Once cut, sand the freshly cut edges with a sanding block to make them as flat and smooth as possible on all sides/edges.
TIP! When you are new to cutting mitered corners (or if you’re not great at math like me), getting your lengths absolutely perfect around your frame can be tricky. So I recommend cutting each length a bit longer than you needed, and then fitting each side to your canvas as you go. This may mean you’ll have to go back and re-cut over and over, but it will ensure your frame pieces ultimately match up and hug your canvas just right (versus being too big or too small).

Step 5 – Glue the Frame Together
With each of the frame’s sides perfectly trimmed down to hug the canvas, place Gorilla Wood Glue at each corner junction and then secure the entire frame with a band clamp (not shown). Again, be sure you wipe away any glue that seeps out before drying.
Nailing the Frame Together
Once the wood is dry, you may be inclined to gently tap finishing nails in at the corners or use flat L-brackets along the back of the frame as corner braces. You certainly can do this, but I don’t think it’s necessary.
We were originally very skeptical that the wood glue would be sufficient to keep the frame together. But it most certainly was. We never added additional nails at the corners; and this frame not only hung perfectly on our walls for 2+ years, but we then moved it twice without any damage.
Step 6 – Fill Corner Seems (Optional)
If you do not like that the mitered corner seems are visible along the front of the frame, you can fill them with wood filler, sand them flat, and touch up the paint so they aren’t noticeable.
I chose not to bother filling the seams and it was hardly noticeable once the canvas frame was hung up on the wall.

Step 7 – Secure Frame to Canvas
The final step is to secure the frame to your canvas. There are two ways to do this:
From the Outside
You can gently tap finishing nails with a hammer from the outside of the frame into the canvas. However, this will leave exposed nails on the outside of the frame, of which you will need to sink, fill the nail holes with wood filler, and touch up with more paint.
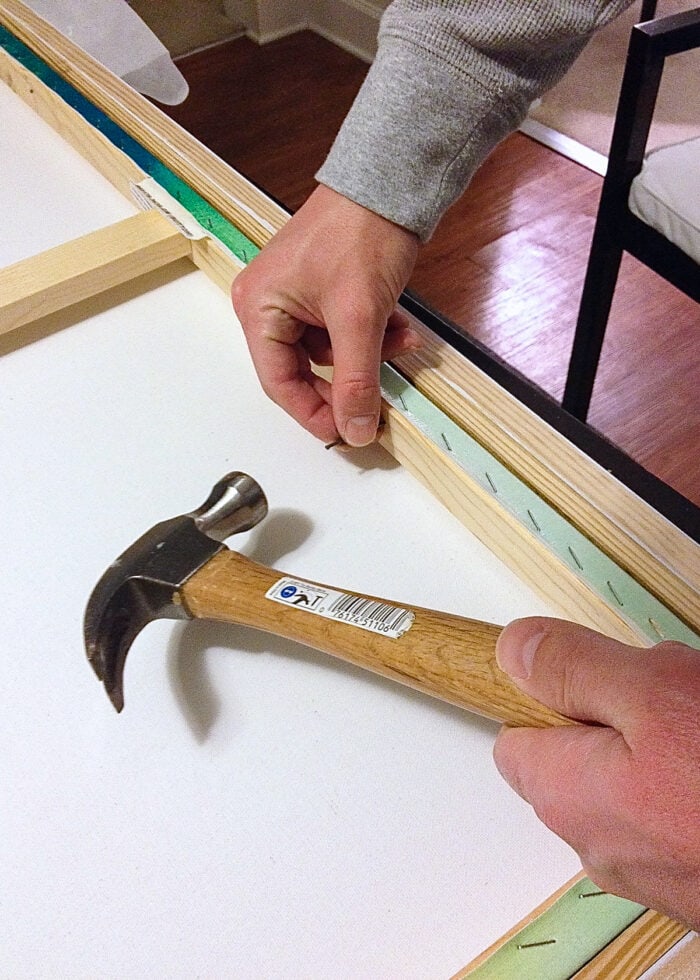
From the Inside
Alternatively, you can flip the entire frame+canvas combination over and nail from the inside canvas into the sides of the frame. If you choose this method, ensure you place the nails toward the back of the frame (the edge that will go against the wall) so the nails don’t show from the front!
Step 8 – Add Hanging Hardware (Optional)
The final step is to add some hanging hardware if needed. Our particular canvas was deep and light enough to sit comfortably on a few nails right on the wall. However, if your frame is shallow or heavy, you can screw some picture hangers or D-rings onto the top or sides of the back of the frame.

I love the clean, polished look this frame gives the artwork. It really helps make the inexpensive art look more professional and finished. But what I love even more is that I learned some new skills along the way! DIYing is so empowering and good for the self-confidence!

You can see this full North Carolina Family Room reveal here.
If you have a canvas hanging in your home and have a hunch it needs a frame, I hope this tutorial empowers you to try and make one yourself! I am NOT a skilled woodworker (I am MUCH better with fabric, paper, and vinyl!), but this was something I could easily tackle with excellent results. Making your own frames can save you a lot of money (especially big ones)…but better yet, you’ll reap double the reward: a great looking piece of art for your home AND immense pride that you did it yourself!
Megan


14 Comments on “DIY Canvas Frame | A Tutorial for Beginners”
Absolutely lovely. It makes a huge difference, too, judging by the before and after shots of the artwork.
During my college years I worked in custom framing and one of my all time favorite tasks was chopping lengths of moulding and assembling frames. If I could go back to any job, it would be that one. 🙂 Be careful you don't get too hooked – lol.
Such a cool DIY! Looks awesome congrats!
Thanks for sharing
Lauren
LB Designs
xx
I had to flip back an forth between the before and after shots to see which I liked better (framed or unframed) I decided that I love them both, but they "say" different things. So the unframed looks beachy and casual while the framed looks more upscale and elegant.
Great job!
Such a great project! I would love for you to link it up to our party: http://www.the36thavenue.com/best-diy-projects-and-recipes-party-2/
Featuring you tomorrow!
What a difference. I have a large canvas in our living room that I don't absolutely love. I think framing it will definitely give it more impact. Great job!
Thanks so much for this tutorial. It was easy to follow, and I framed my Aunt’s oil painting, using the same white/gold combination that you did. I love how it turned out.
Hi Megan, I just found this tutorial. Thanks so much! I do have a question for you. Did you choose the 1×2’s because the depth of your canvas was under 2 inches? I have some canvases that are different thickness and wanted to make sure I made them correctly.
In the photos above you show the two pieces clamped together. Are they both flush at the bottom or is the smaller piece centered on the larger?
Thanks so much for your info!
Looks fabulous! Love this idea!
Pingback: LIVING ROOM REVEAL – Diary of a DIY mama
Thanks so much!! I’ve been making frames for my art canvas since reading this. I use 1×2 and 1×1 nailing strips and I use a “frame clamp” to hold it tight while the glue dries. Awesome!!
Pingback: The 15 BEST Tutorials for DIY Frames | Kaleidoscope Living
Thank you so much for this fantastic tutorial! I also have recently purchased artwork that I think would look better framed (and as we know, framing is very expensive!). This is going on the list of projects!
I came here to tell you that I saw your post pinned several years ago, thought it was cool, and moved on. Then, when I did purchase unframed canvas art this summer, yours was the only DIY Float Fame that I wanted to do. I’ve been scouring Pinterest all over again just to find your tutorial. Yours made a lovely impression, and I’m so glad to have finally found you.
Awww…thank you for circling back to tell me that! That really means a lot!
Hope you were able to frame your new art without much trouble!
~Megan